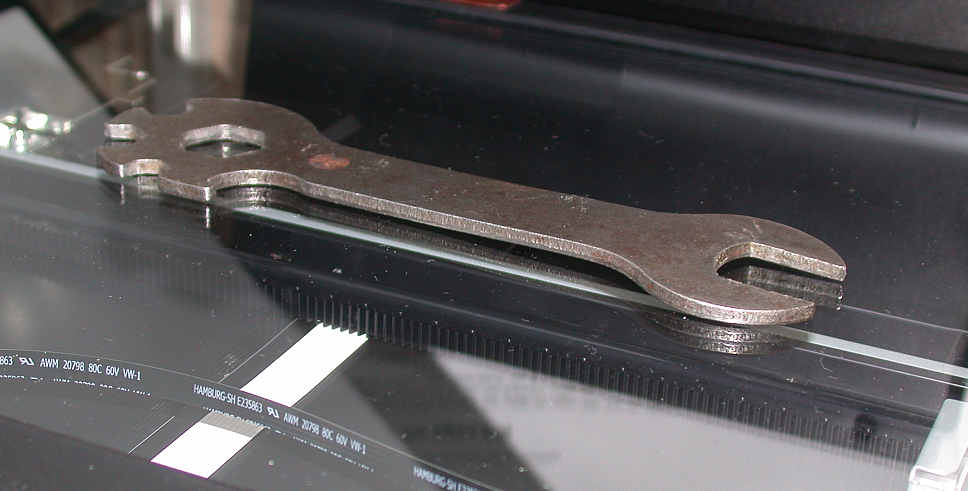

When Carsten Arnholm decided to buy a 3D printer, he realized he was going to have to do some serious backtracking before he could use his new machine. So he went back — way back, to his childhood. He got his hands on a metal wrench he’d gotten along with his very first bicycle. The wrench became a symbolic tool of sorts, one that helped Arnholm demystify 3D design and printing.
Arnholm, who lives in Norway and lists as interests astronomy, software, and “things like the Raspberry Pi,” has his own blog on which he related the story of his self-education in 3D design. While he awaited delivery of his new 3D printer, Arnholm decided to school himself not only in the software he’d be using to manage his printer, but also design programs — as much of it open source as possible.
In order to begin his 3D education, Arnholm decided he’d conduct what he referred to as a “reverse 3D-printing experiment.” That’s where the metal wrench came in.
“The starting point when using a 3D printer,” he explained, “is a virtual 3D computer model of the object you are printing.”
However, he already had the object he wanted to print — the wrench — so his plan was to take the real thing and make it virtual before making it real again. If this sounds a bit like a riddle, hold tight and I’ll explain.
Arnholm’s first step was scanning the metal wrench, which he accomplished using a cheap flatbed scanner he already had in order to create an accurate profile of the object in 2D. He scanned the wrench and created a BMP file, which he then adjusted using Photoshop CS2, smoothing out the edges of the 2D wrench and arriving at a crisp, black silhouette.
What comes next is not necessarily complicated, but it is painstaking, so you’re getting an overview here and can read Arnholm’s blog if you’re compelled by the nitty gritty details. He wanted to vectorize the basic, 2D structure of the wrench, so he devised a process that first required him to convert the BMP to DXF format.
Like any good plot, this one has twists and turns, however, and before Arnholm could get his wrench to DXF, he had to “take a detour via SVG format and Encapsulated Postscript (EPS) format” first, he explained.
On this detour, Arnholm used two different maps, if you will. He worked in Windows and Linux, converting to SVG from BMP in Linux Kubuntu using Inkscape to create an EPS file and pstoedit to get his vectorized DXF file, which provided him with what he referred to as “a trace of the wrench edges” — in other words, a series of vectors.
After vectorizing, Arnholm could begin the process of creating his 3D model of the wrench. He used OpenSCAD in keeping with his goal to use as much open source software as possible, which is surprisingly easy to do these days. He imported his DXF file to OpenSCAD and began the final steps in the process of creating his 3D model.“With this model,” wrote Arnholm, “we have everything required for creating a 3D-printed replica.”
Reading his blog you get a sense of Arnholm’s genuine enthusiasm, as he leads you through his hands-on learning process. When he finally creates the STL file, you cannot help but wish you could be there when his 3D printer arrives, is installed, and the wrench is printed. I like to imagine a scene something like you’d see on Christmas morning.
Arnholm concluded his account of the “reverse 3D printing experiment” by pointing out the surprisingly varied options with regard to “incredibly powerful and free software tools available.” When used with diligence and creativity, he added, you can “arrive at some rather impressive results.” Arnholm’s blog and experiment are, additionally, a testament to the maker spirit and to the spirit of sharing that so thoroughly characterizes the culture of 3D printing.
Did you use a similar method to learn 3D printing, or a more formal process? Let us know your thoughts on learning 3D design and printing techniques in the Reverse 3D Printing Experiment forum thread over on 3DPB.com.
If you're in need of 3D interior and exterior design services in the USA, our platform offers a comprehensive solution to bring your architectural projects to life. Through our service, you can request detailed 3D renderings that showcase both the interior and exterior of your property. Whether you're designing a home, office, or commercial space, our experts deliver photorealistic visualizations that highlight every element, from furniture arrangements to building facades, ensuring that your vision is accurately represented.
Through our website, you can easily access 3D interior and exterior design services tailored to your specific needs. With our help, you'll be able to create stunning visual representations of your designs, allowing you to present them to clients, investors, or stakeholders in a professional and engaging manner. Our team focuses on bringing out the best in your designs, ensuring that both the interior spaces and exterior elements are rendered with the highest level of detail and realism.


