
We talk about the finishing process quite often regarding 3D models. And while sometimes that final phase of fabrication can be a bit of a pain, mostly it’s just plain fun too, allowing for users to explore different products and materials. It sometimes gives us the opportunity to try new methods—and often with the most enjoyable results when we ask ‘I wonder what will happen if I do this?’
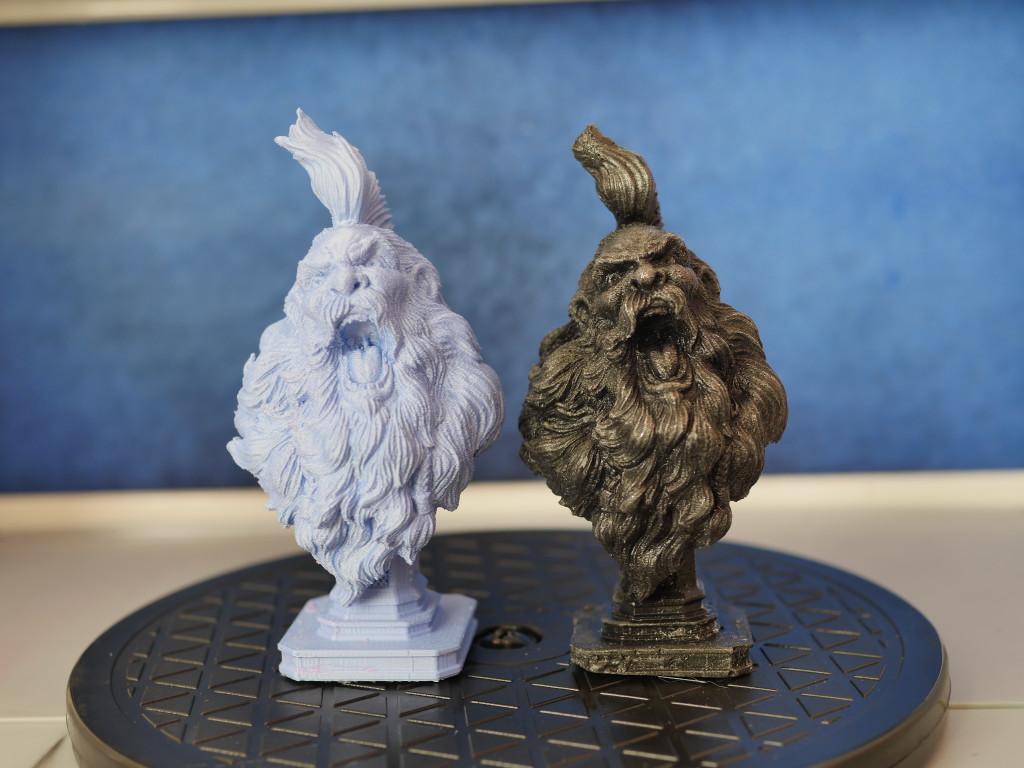
While 3D printing in metal is out of reach for most of us working from the desktop, there are other ways to achieve that look, and cold casting can be a lot of fun to experiment with. We’ve followed Mold3D previously as they instructed users in a great—and fairly seamless—way to get started with cold casting, and now one of their fans, Mauvis Ledford of San Francisco, has taken this on to produce none other than the ‘The Bearded Yell.’
Working from the intermediate level, Ledford used the original model already created on Thingiverse, by user Ben Dansie, who had previously been inspired by ‘beardly goodness.’ Allowing that theme to march on, and into even further elevated form, Ledford took off on his own journey to cold cast the piece, mixing clear resin with iron powder.
With supporters from Reddit offering up help (and also with a sizeable conversation on the process sparking up), working with bedansie’s model and learning from Mold 3D’s video, Ledford had valuable resources to work with in his project.
Here’s a list of the materials, items, and tools purchased and used:
- CMS Magnetics, 12 oz. of Industrial Grade Iron Powder ($7.38)
- Smooth-On Silicone Mold Making Rubber OOMOO 30 ($30.45)
- Clear polyester casting resin (with accompanying catalyst solution) – 32oz ($31.48)
- Loew Cornell 1021167 Woodsies 150-Count Craft Sticks ($6.74)
- Glue gun and sticks ($11.39)
- Genuine Joe GJO15361 5-Mil Light Powder Industrial Nitrile Gloves, Medium, Light Blue—100 pack ($10.17)
- CRC Food Grade Mold Release, 11.5 oz Aerosol Can, Clear ($10.46)
- 3M Paint Project Medium Respirator ($27.54)
In getting started, the first step is to make an enclosure box for the mold. While in the instructional video, they simply used a plastic cup, Ledford constructed a box from spare cardboard that is waxed on one side. Once the Bearded Yell model was safely secured in the bottom with hot glue, Ledford began pouring in the silicon mold liquid. (As a note, he also sprayed the model with mold release previous to this step.)
While there were a few hitches, from the enclosure box being too large–to running out of sufficient silicone for the mold—to um, a bunch of popsicle sticks and extra cardboard being mashed into the mix in an attempt to ‘increase the mixture height to capture the whole piece,’ Ledford’s project turned out pretty well despite some lack of aesthetics in the beginning.
“[The] end result works but looks pretty janky,” said Ledford.
As he reported though, the next day the mixture had indeed turned to rubber, and although the box may not have been pretty, it was easy to remove and after some careful handling, the bearded one was successfully removed from the mold, and Ledford noted how well all the detail was produced inside.
“The piece came out successfully unharmed,” said Ledford. “The only issue was there was some pink left in some crevices, undoubtedly because I didn’t mix the rubber for the entire 3 minutes–I did maybe 1.5 minutes. [The] formula must be mixed thoroughly for it all to cure.”
Using the ‘Clear polyester casting resin’ Ledford forged ahead, although not quite sure what to do with or how much to use of the ‘Catalyst,’ which was included.
“I clearly didn’t use enough catalyst (I used about eight drops) as the resin has not fully cured two days later when I pull it out,” stated Ledford as work was in progress. “I also added a bit of iron powder at the base just to see what that would look like. It seems that some of the iron powder traveled to the center of the body. Overall not looking too great, but lots of lessons learned.”
With the first try not really up to stuff in terms of Ledford’s expectations, he spray-painted the copy white and put the project up on the shelf for a few days. When he came back to it, he’d had some time to reflect on where he might have gone wrong.
“A few days later, I get brave enough to attempt #2,” says Ledford.
He mixed the iron powder and the resin—and it’s important to see that he did also employ the recommended safety measures with gloves and respirator—and poured it into the mold, still experiencing a tiny bit of leakage like before, but nothing prohibitive. The end result is a great-looking model that’s dense in weight due to the iron. After some airbrushing and burnishing with steel wool, ‘The Bearded Yell’ turns out to be an amazing sample of what you can do with cold casting.
Not only is the project fun and informative, but it’s a great example too of what the 3D printing community is all about, with Ledford working from another user’s file offered for download to make what he thought would be some fun improvements, yet too offering his trials and failures along the way as a learning experience for everyone else. Indeed, his finished project caught the eye of bedansie, who is a 3D printing designer from Australia:
“In all seriousness, this is why I share models. Thank you for sharing your experience with the cold cast process, leaving in the things that went wrong for others to learn from and for sharing the end result!”
According to Ledford, the whole process cost him about $135, but he reminds users that most of the items he purchased can be used in a number of projects to follow. And as he explains to one of his followers on Reddit, one thing he did not calculate above into the making of this piece was this: “the security and contentment that you now know how to make badass resin and cold cast prints = priceless.” Agreed—and bravo! Have you tried cold casting? Discuss in the Cold Casting 3D Prints forum over at 3DPB.com.
If you're in need of 3D interior and exterior design services in the USA, our platform offers a comprehensive solution to bring your architectural projects to life. Through our service, you can request detailed 3D renderings that showcase both the interior and exterior of your property. Whether you're designing a home, office, or commercial space, our experts deliver photorealistic visualizations that highlight every element, from furniture arrangements to building facades, ensuring that your vision is accurately represented.
Through our website, you can easily access 3D interior and exterior design services tailored to your specific needs. With our help, you'll be able to create stunning visual representations of your designs, allowing you to present them to clients, investors, or stakeholders in a professional and engaging manner. Our team focuses on bringing out the best in your designs, ensuring that both the interior spaces and exterior elements are rendered with the highest level of detail and realism.


